Oracle Cloud

Oracle Cloud Deployment

Two Oracle Cloud Free Tier machines — one Windows Server promoted as the child domain controller for vought.hq.apex-corp.xyz, and one Ubuntu Linux machine joined to it. Both connected via WireGuard back to DC01 on Vultr.

Oracle Cloud deployment for child domain controller
Deploying a child DC and Linux workstation on Oracle Cloud

Overview

Oracle Cloud Free Tier is generous enough to run two decent machines without paying anything. We used it to add the second tier of the lab — a child domain controller (VOUGHT-HQ) and an AD-joined Linux box (BATCAVE). Both connect back to DC01 on Vultr through WireGuard.

graph TB subgraph ORACLE ["☁️ Oracle Cloud — APEXnet VCN"] DC02["VOUGHT-HQ (DC02)
Child DC · DNS
vought.hq.apex-corp.xyz
10.10.0.2"] LX01["BATCAVE (LINUX01)
AD-joined Ubuntu
domain: vought.hq.apex-corp.xyz
10.10.0.3"] end subgraph VULTR ["☁️ Vultr — Main Hub"] HUB["STARK-TOWER (DC01)
Root DC
hq.apex-corp.xyz
10.10.0.1"] end LX01 ---|"Oracle VPC internal"| DC02 DC02 -->|"WireGuard Mesh"| HUB style HUB fill:#1a3a1a,stroke:#a4ff91,color:#fff style DC02 fill:#3a2a1a,stroke:#ffaa44,color:#fff style LX01 fill:#3a2a1a,stroke:#ffaa44,color:#fff

Step 1 — Deploy Windows Server (VOUGHT-HQ)

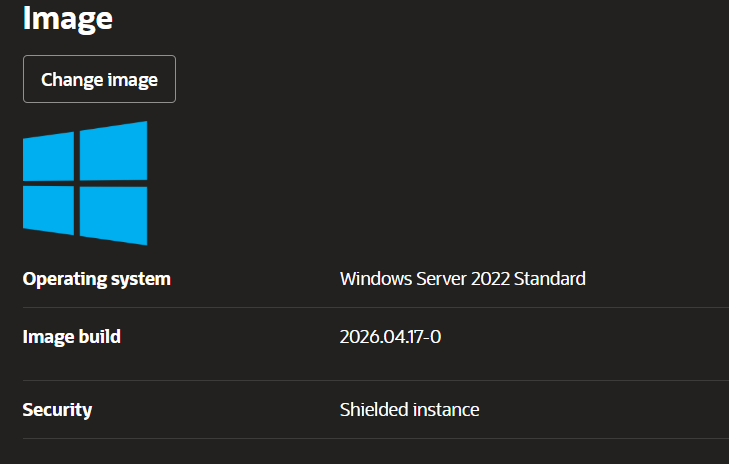
Logged into Oracle Cloud, went to Compute → Instances → Create Instance. Changed the default image to Windows Server 2022 Standard.
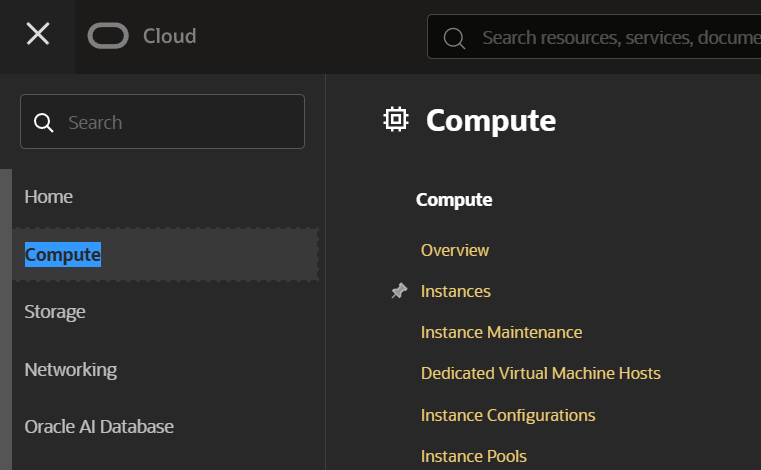
Oracle Cloud compute navigation menu showing the path to Instances under Compute
Oracle Cloud console — navigating to Compute → Instances
Oracle instance creation showing the image changed from Oracle Linux to Windows Server 2022 Standard
Changing the image to Windows Server 2022 Standard

Selected shape: VM.Standard.E4.Flex with 2 vCPU and 32 GB RAM.
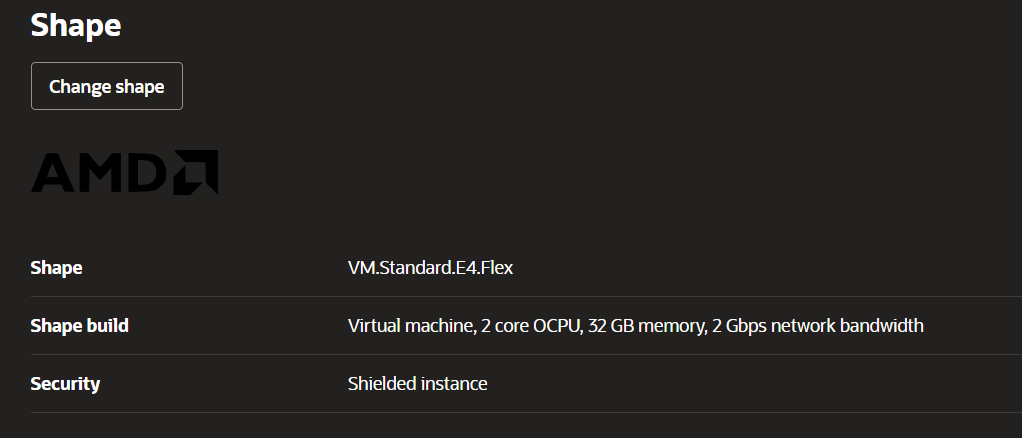
Oracle shape selection showing VM.Standard.E4.Flex with 2 OCPUs and 32 GB RAM
Shape: VM.Standard.E4.Flex — 2 vCPU, 32 GB RAM

For networking, created a new VCN called APEXnet and set the primary VNIC to use it.
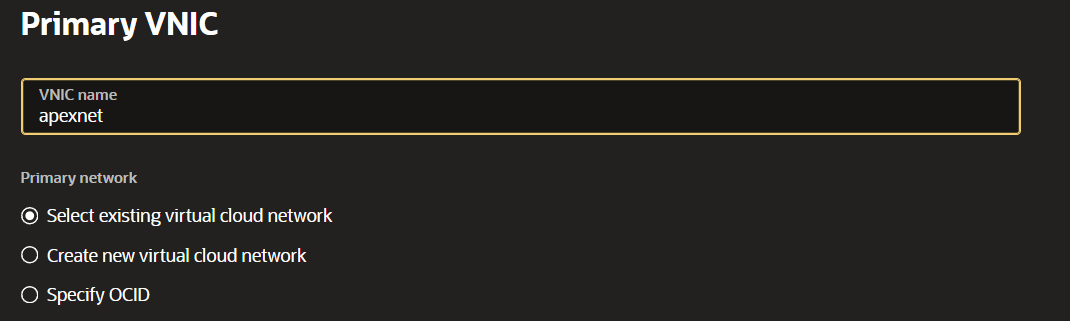
Oracle networking section showing new VCN APEXnet being created for the instance
New VCN called APEXnet created for the lab machines
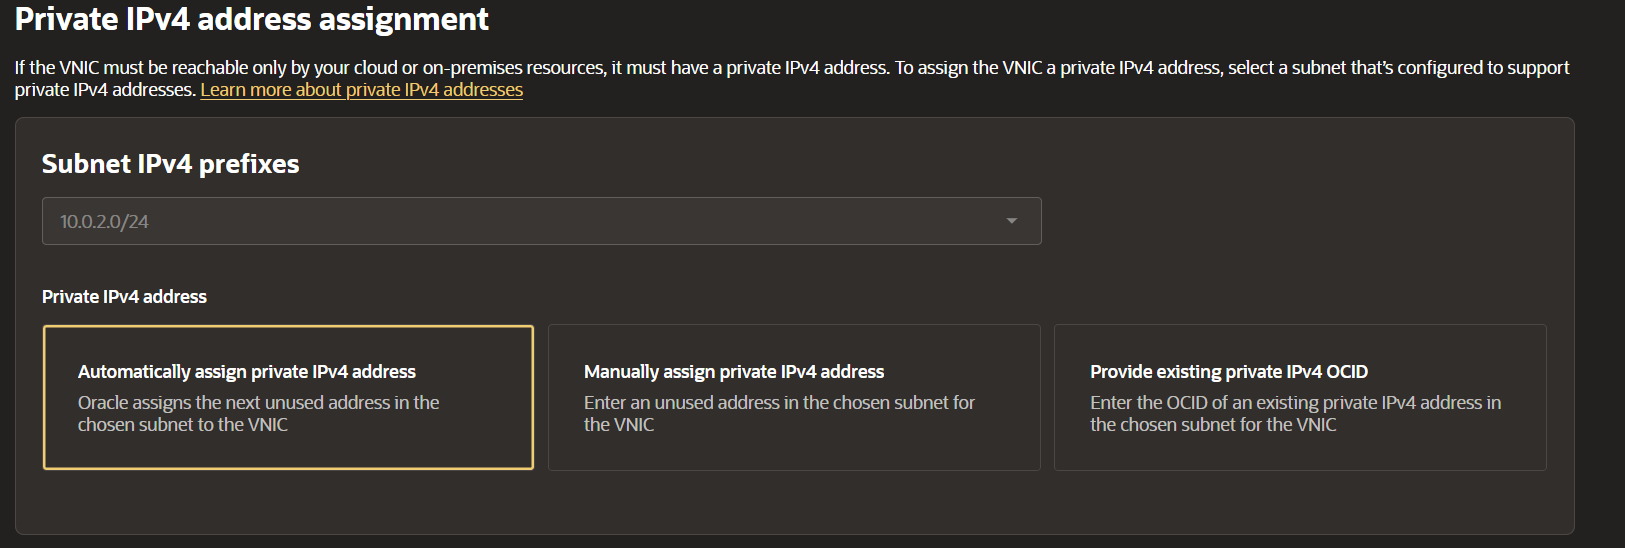
Oracle instance creation showing automatically assign private IPv4 address selected
Automatic private IP assignment selected
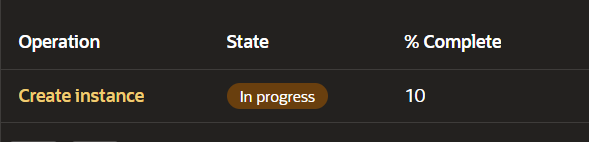
Oracle Cloud instance dashboard showing VOUGHT-HQ Windows instance provisioning at around 10 percent
Instance provisioning — Oracle takes a few minutes to set up Windows

Step 2 — Deploy Ubuntu Linux (BATCAVE)

Created a second instance in the same VCN. This one runs Ubuntu 22.04 and is the AD-joined Linux box named BATCAVE.
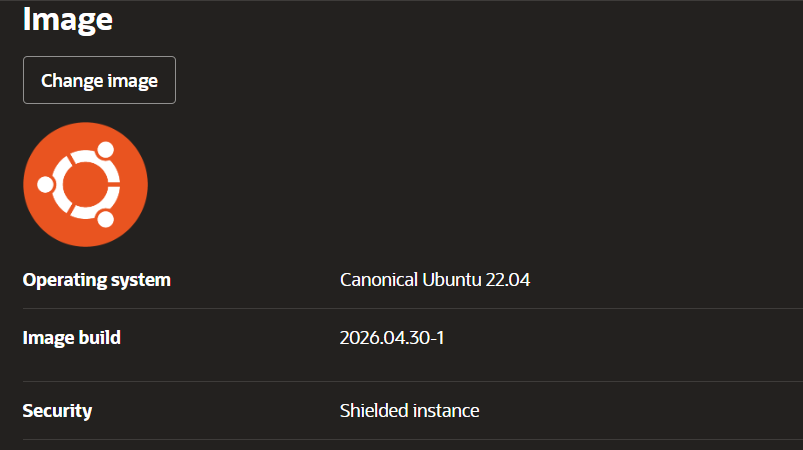
Oracle instance creation with Ubuntu 22.04 LTS selected as the image
Second instance — Ubuntu 22.04 as the OS
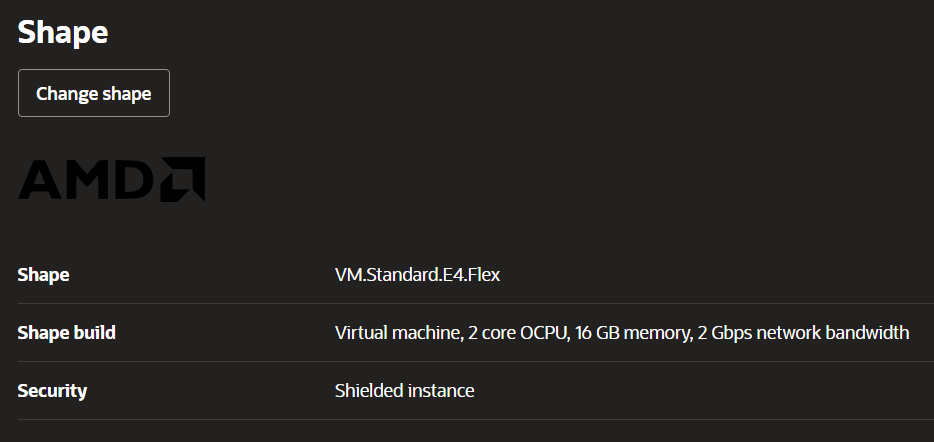
Oracle shape selection showing VM.Standard.E4.Flex AMD with 2 vCPU and 16 GB RAM for the Linux instance
Linux instance shape: 2 vCPU, 16 GB RAM

Generated a new SSH key pair and downloaded the private key — you need this to SSH into the machine.
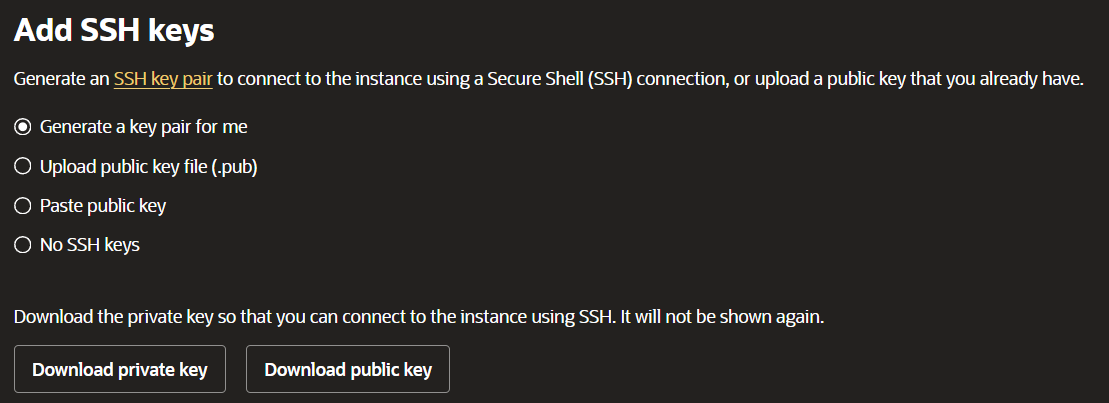
Oracle SSH key generation section showing Generate a key pair selected and the download private key button
Generate and download the SSH private key — you only get one chance to download it
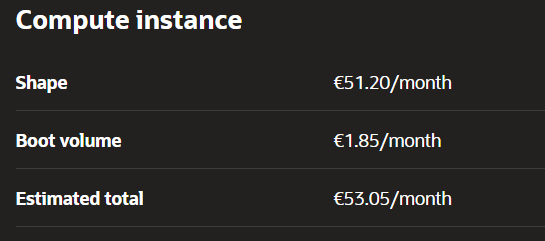
Oracle cost estimator showing approximately 53 euros per month for the Linux instance
Estimated cost shown — around 53 euros/month (this would be on a paid tier)

After both instances were ready, the Instances page showed both machines with their public and private IPs.
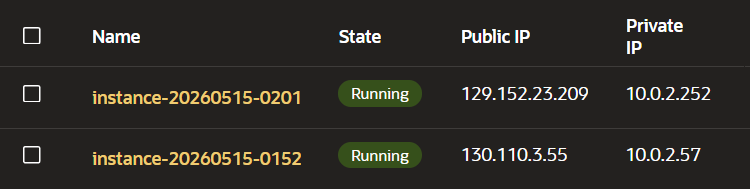
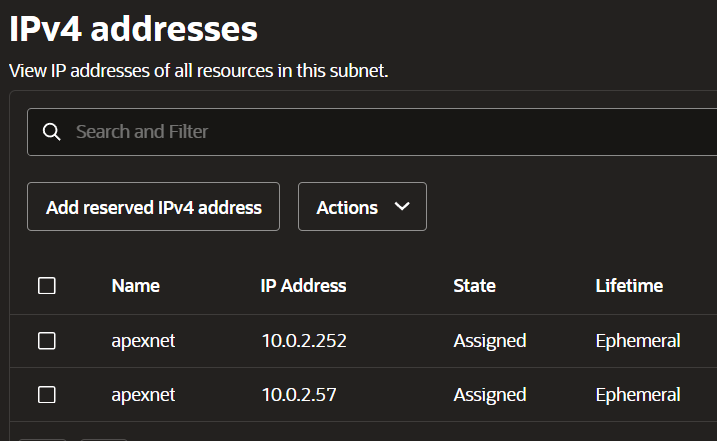
Oracle Cloud instances list showing VOUGHT-HQ Windows and BATCAVE Linux with their IP addresses
Both instances running — Windows VOUGHT-HQ and Linux BATCAVE
Oracle VCN subnet showing both machines' private IPs on the APEXnet network
VCN subnet view — both machines on the same private network

Step 3 — Open Firewall Ports in Oracle Security Lists

Oracle blocks all inbound traffic by default. Before RDP could work, the security list needed inbound rules added.

Tried RDP right after provisioning — it did not connect:
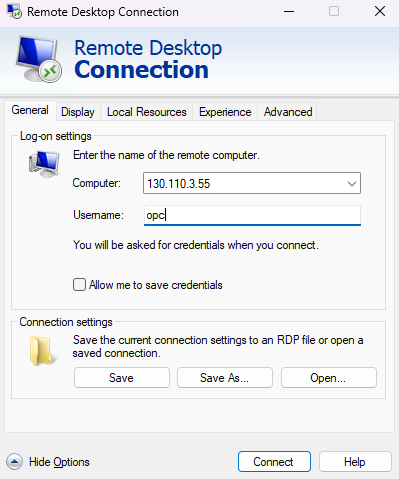
RDP connection attempt failing with connection timed out error before security list rules were added
RDP times out — Oracle's default security list blocks everything

Went to Networking → Virtual Cloud Networks → APEXnet → Security Lists → Default Security List. Added ingress rules:
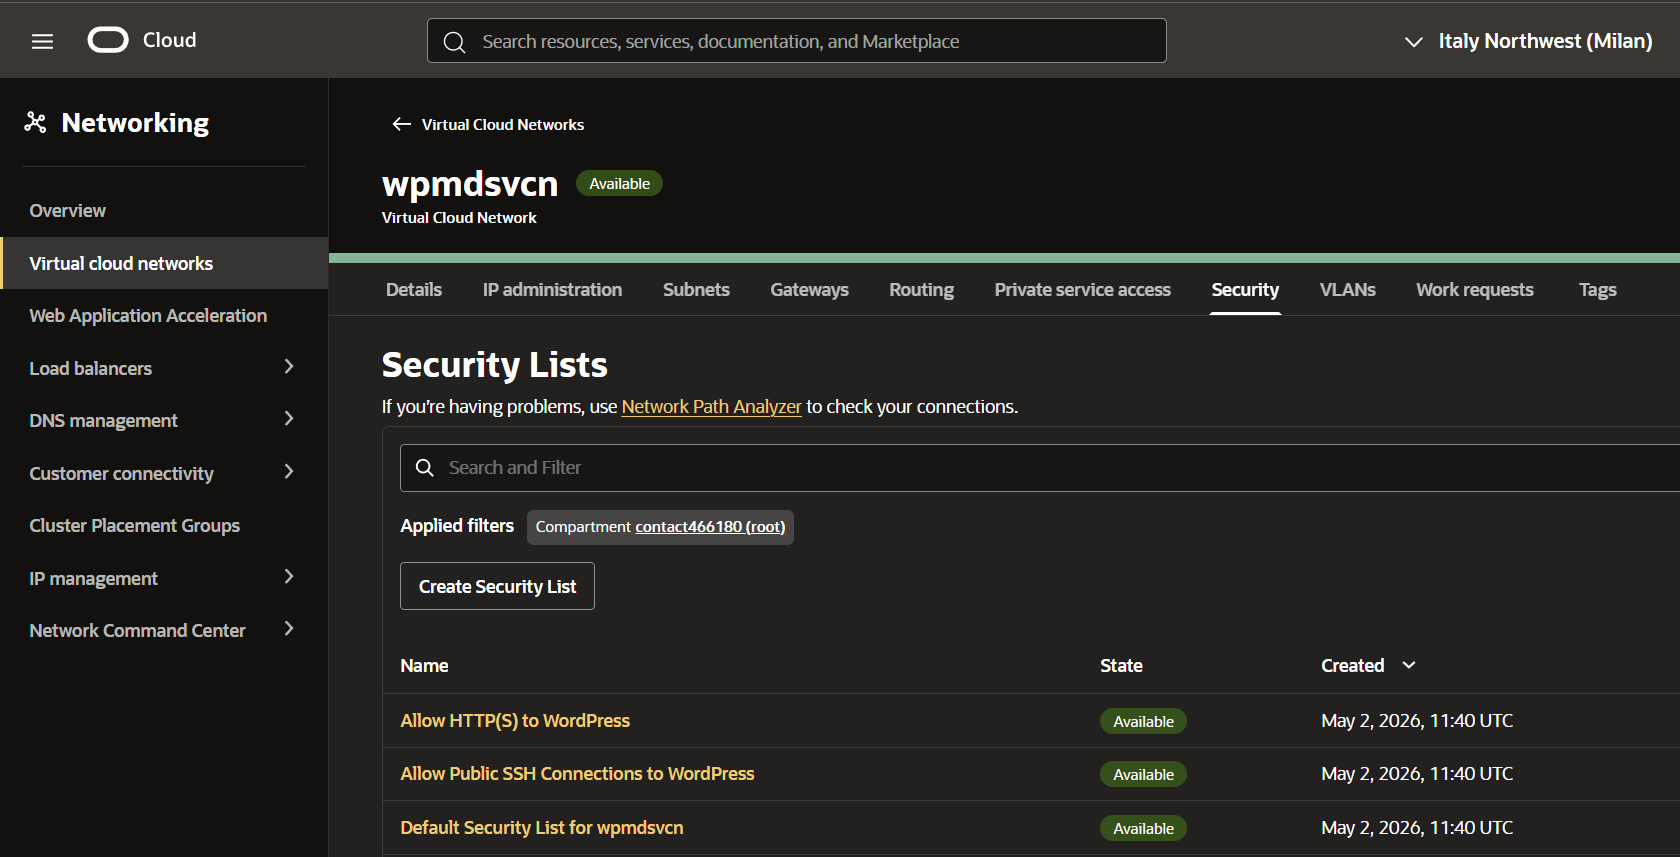
Oracle Security List ingress rules section showing the Add Ingress Rules button
Adding ingress rules to the Oracle security list

Added RDP (TCP 3389) with source CIDR 0.0.0.0/0:
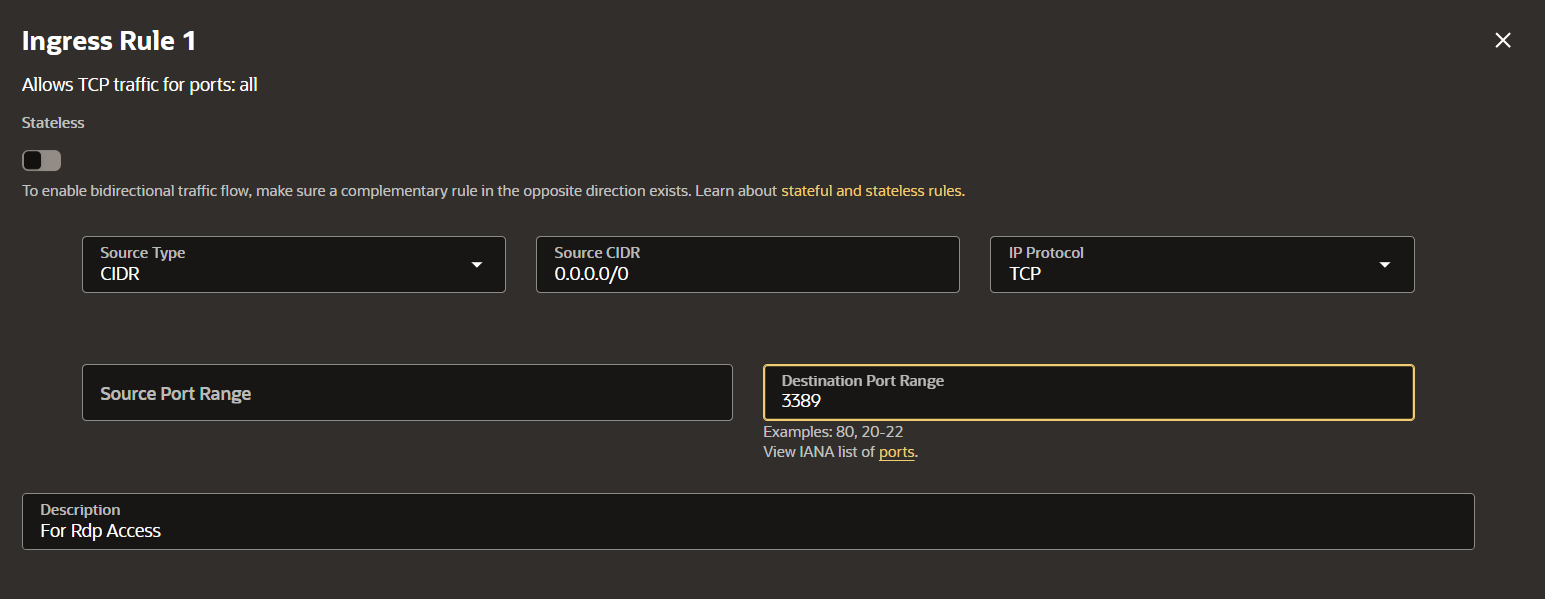
Oracle Add Ingress Rule dialog showing TCP port 3389 with source CIDR 0.0.0.0/0 for RDP
Adding the RDP inbound rule — TCP 3389 from anywhere

Final ingress rules list after adding all required rules:
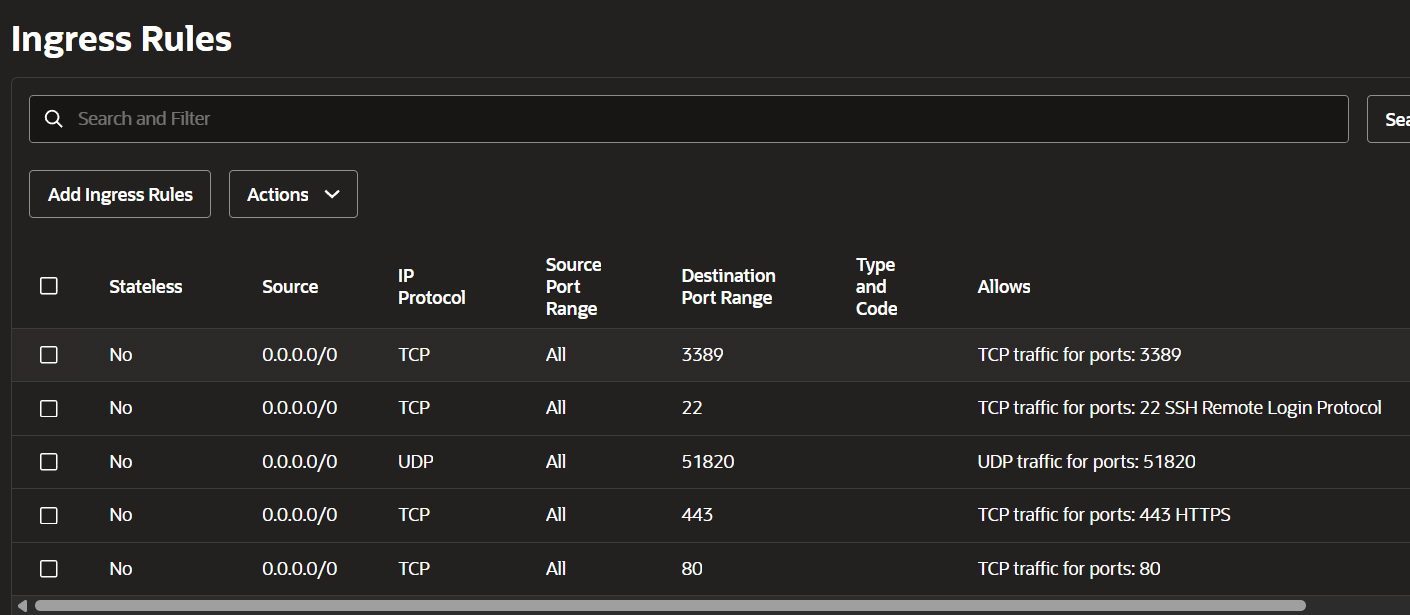
Oracle security list showing all ingress rules including TCP 3389, UDP 51820, and TCP 80 and 443
All inbound rules added — RDP, WireGuard (UDP 51820), HTTP, HTTPS
Applying Security Lists

To apply a security list to an instance: go to the instance → find which subnet it uses → click the subnet → go to the Security tab → select the security list. The rule applies to all instances in that subnet.

Step 4 — Rename and Initial Setup on Windows

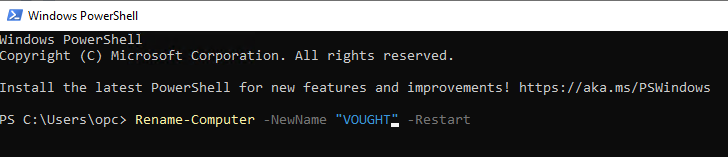
After RDP was working, connected to the Windows machine and renamed it to VOUGHT:

PowerShell
PS> Rename-Computer -NewName "VOUGHT" -Restart
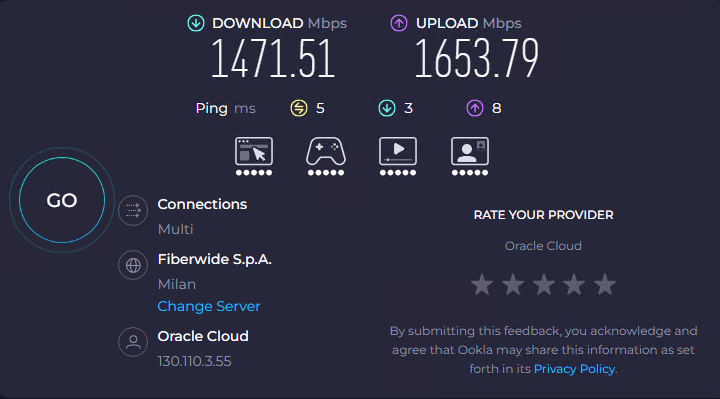
Speed test on the Oracle Windows machine showing high download and upload speeds
Oracle speed test — decent internet on the machine
PowerShell showing Rename-Computer command running to rename the server to VOUGHT
Renaming the machine to VOUGHT before promoting it

After reboot, set the DNS to point at DC01's WireGuard IP so the machine can resolve the AD domain:
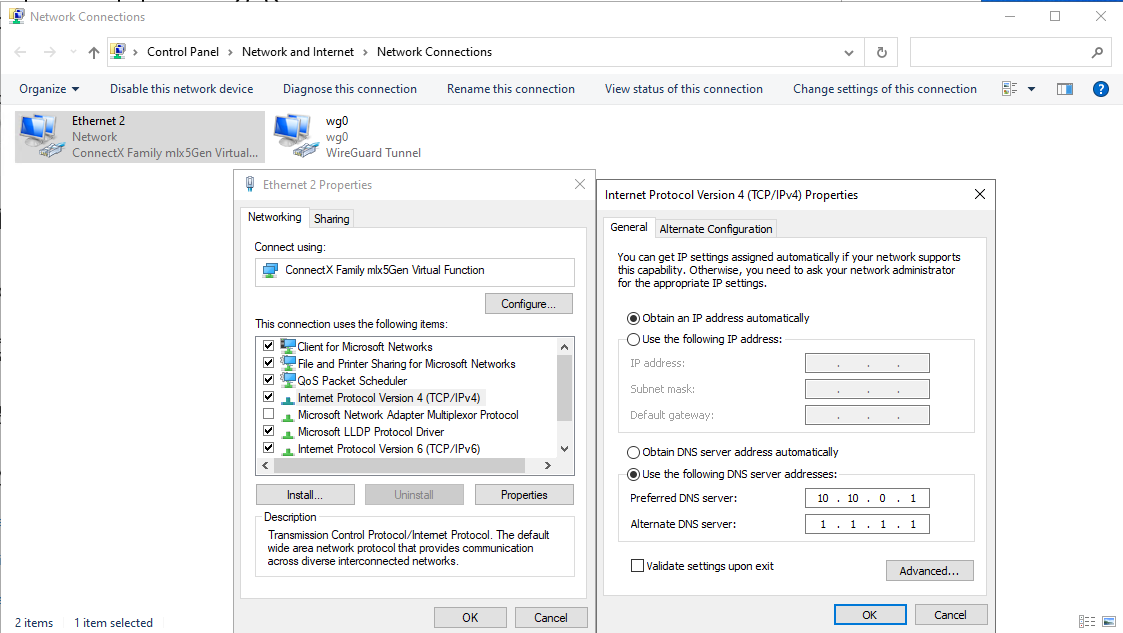
Windows IPv4 Properties on VOUGHT showing preferred DNS set to 10.10.0.1 (DC01 WireGuard IP) and alternate DNS to 1.1.1.1
DNS set to 10.10.0.1 — DC01's WireGuard IP is now the resolver

Step 5 — Install AD Roles on Windows

Opened Server Manager → Add Roles and Features. Selected Active Directory Domain Services, File and Storage Services, and Web Server (IIS).
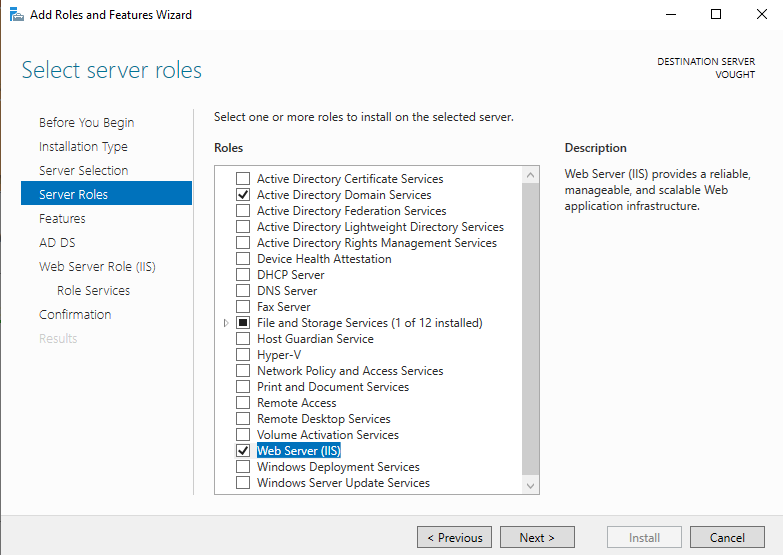
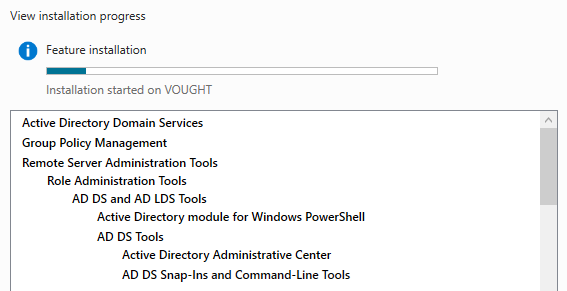
Server Manager Add Roles and Features wizard showing AD Domain Services, File Services, and IIS selected
Selecting roles — AD DS, File Services, and IIS
Server Manager role installation progress showing features being installed with a progress tree
Role installation in progress

After installation, a flag appeared in Server Manager — "Promote this server to a domain controller":
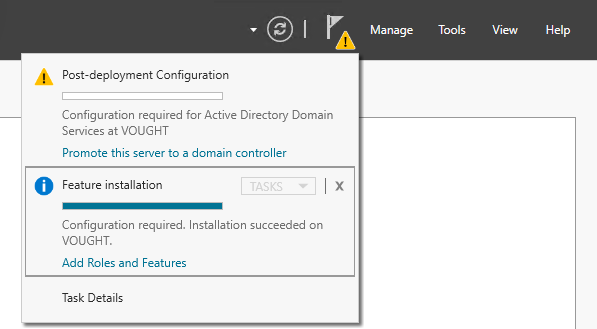
Server Manager showing the yellow flag notification to promote this server to a domain controller
Yellow flag in Server Manager — click it to start the DC promotion wizard

Step 6 — Promote as Child Domain Controller

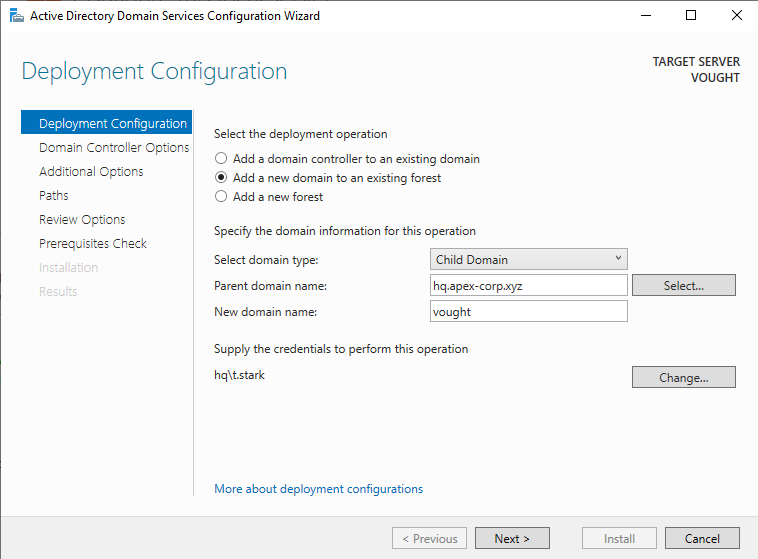
Clicked the flag to open the AD DS Configuration Wizard. Selected "Add a new domain to an existing forest" and specified the child domain details:

AD DS Configuration Wizard showing Add new domain selected, parent domain hq.apex-corp.xyz, new domain name vought
Child domain configuration — adding vought under hq.apex-corp.xyz
Weak Password Error

The promotion wizard refused to continue because the default Oracle administrator password was too weak. Fix it first:

CMD — set a strong admin password
C:\> net user administrator YourStrongPassword123!

CMD showing net user administrator command run successfully to set a stronger password
Setting a strong administrator password so the promotion wizard accepts it

In the Domain Controller Options tab: functional level Windows Server 2016, Global Catalog enabled, DNS enabled, DSRM password set.
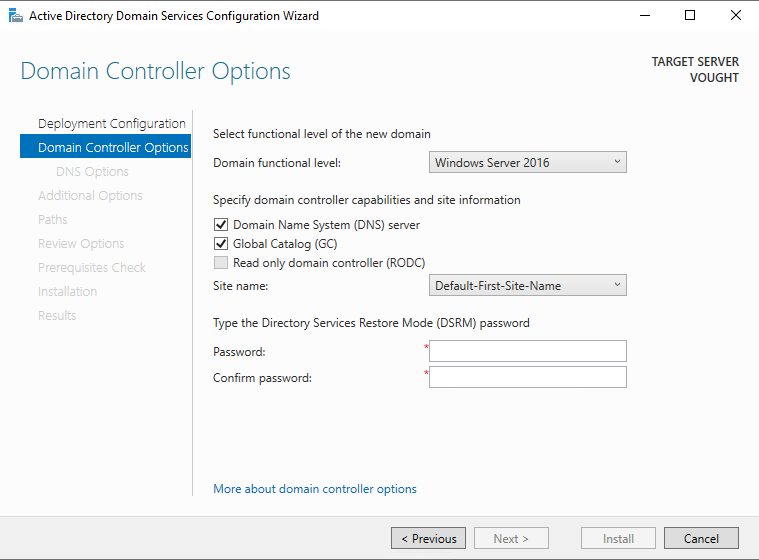
AD DS wizard Domain Controller Options tab showing Windows Server 2016 functional level, Global Catalog checked, and DSRM password entered
DC options — Global Catalog and DNS enabled, DSRM password set

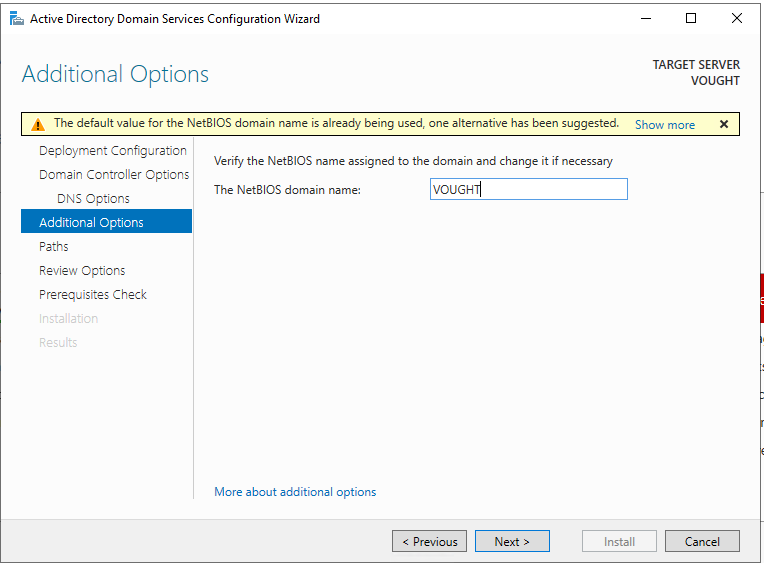
NetBIOS name set to VOUGHT:

AD DS wizard NetBIOS name field showing VOUGHT entered
NetBIOS name set to VOUGHT

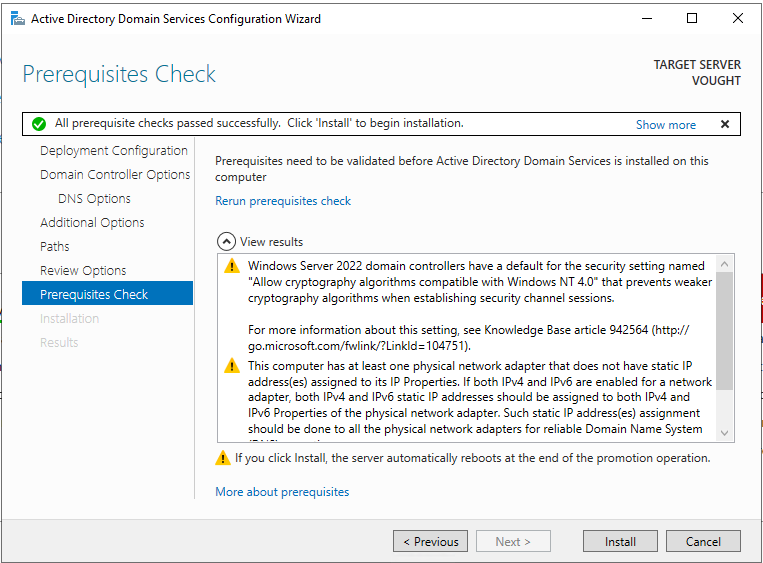
Prerequisites check passed:

AD DS wizard prerequisites check showing all green checkmarks and ready to install
Prerequisites check passed — ready to promote
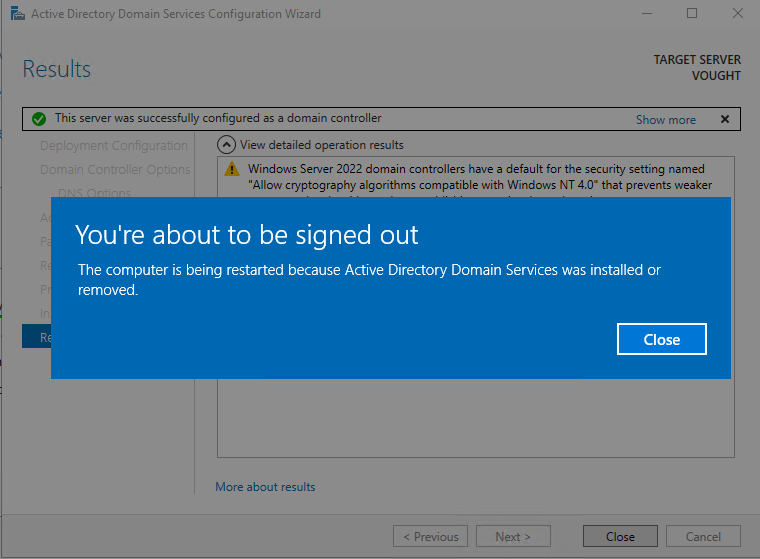
Windows blue restart warning screen indicating the DC promotion is complete and server is restarting
Windows restart warning — promotion succeeded, server is rebooting

Step 7 — Verify Domain Trust

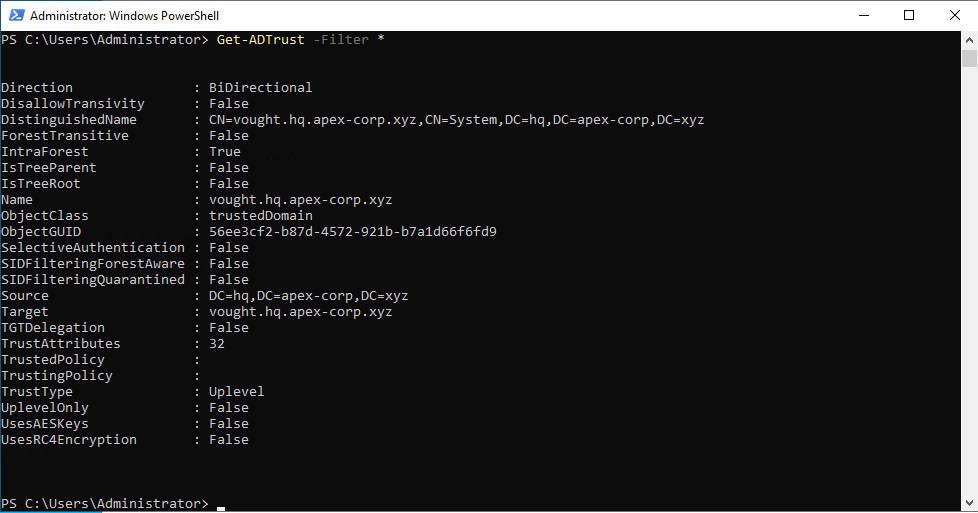
After reboot, ran Get-ADTrust to confirm the forest trust between parent and child domains:

PowerShell
PS> Get-ADTrust -Filter *
PowerShell Get-ADTrust output showing bidirectional trust between hq.apex-corp.xyz and vought.hq.apex-corp.xyz
Forest trust confirmed — bidirectional trust between parent and child domain

Opened File Explorer on VOUGHT and navigated to Network — could see the shares from the parent domain DC (STARK-TOWER). That confirms the cross-domain trust is working.
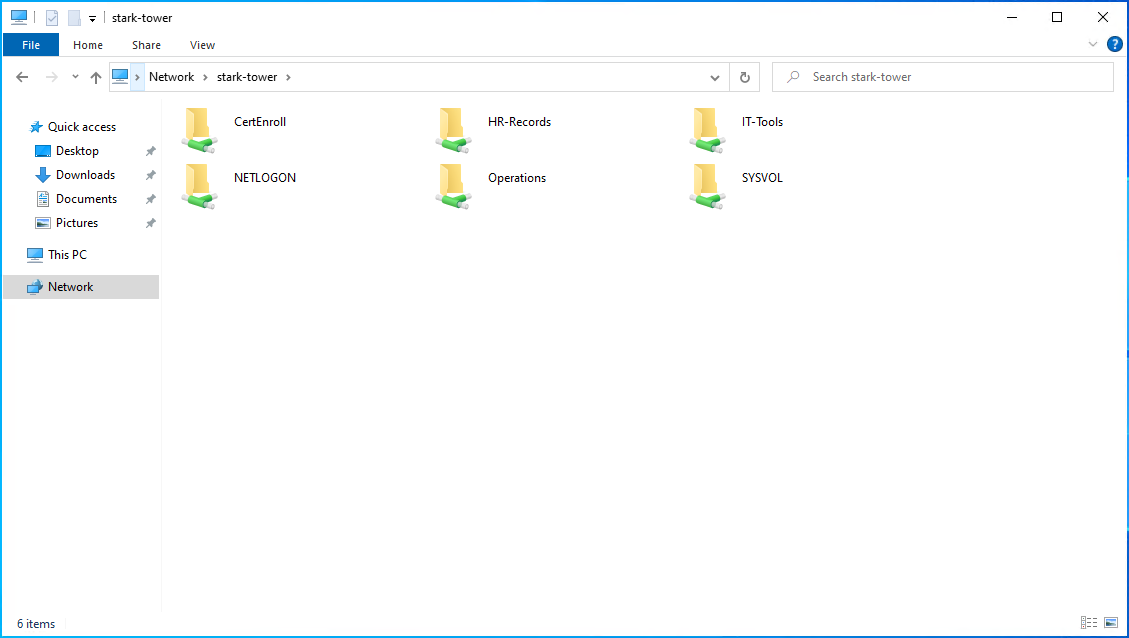
File Explorer on VOUGHT machine showing STARK-TOWER shares visible in the Network section
STARK-TOWER shares visible from VOUGHT — domain trust is fully working
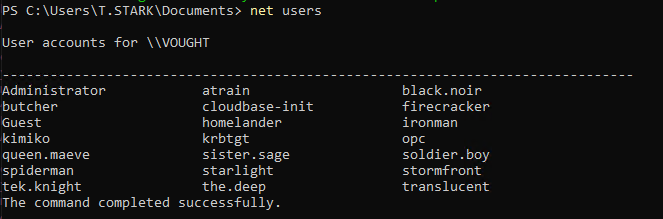
net user command output on VOUGHT showing characters like Butcher, Kimiko, Queen, Spider-Man from parent domain
Parent domain users visible on the child domain — forest trust in effect

Step 8 — Intentional Misconfigurations

Several vulnerabilities were planted on the child domain to create a realistic attack surface.

SPN on a User (Kerberoasting Target)

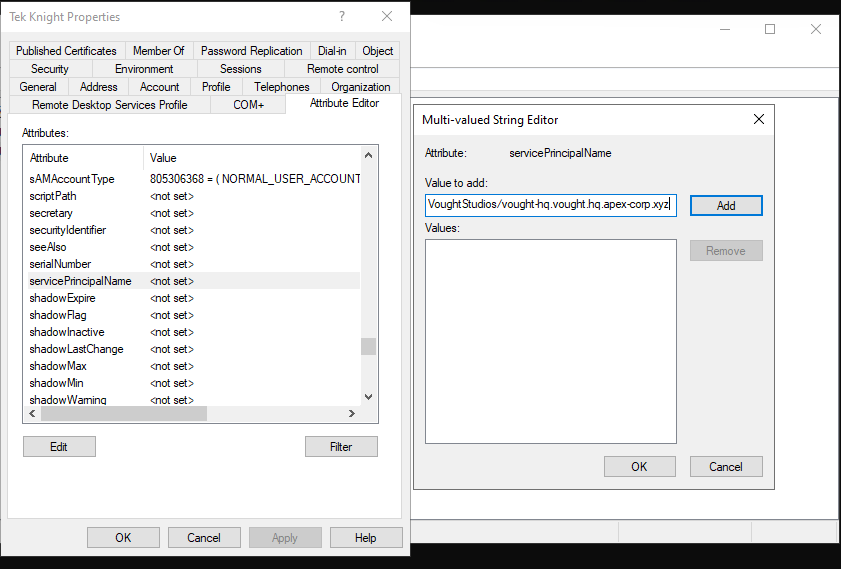
Opened Active Directory Users and Computers on the child domain, navigated to VOUGHT Studios OU, opened a user's Attribute Editor, and added a Service Principal Name — this makes the account Kerberoastable.
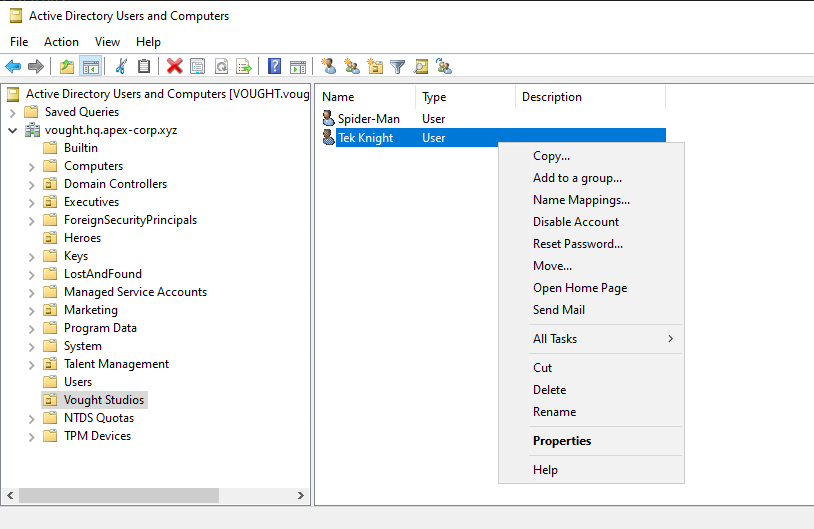
Active Directory Users and Computers on vought.hq.apex-corp.xyz showing VOUGHT Studios OU with users
VOUGHT Studios OU on the child domain — selecting a user to add an SPN to
User Attribute Editor in ADUC showing servicePrincipalName value being added
SPN added via Attribute Editor — this account is now Kerberoastable

AS-REPRoastable Account

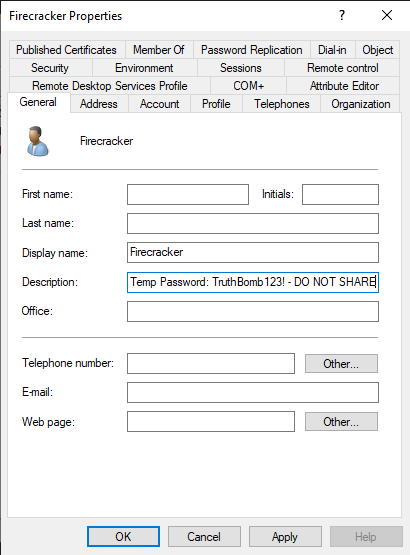
On another user, opened Properties → Account tab → checked "Do not require Kerberos preauthentication". Also added the password in the Description field — bad practice that admins actually do.
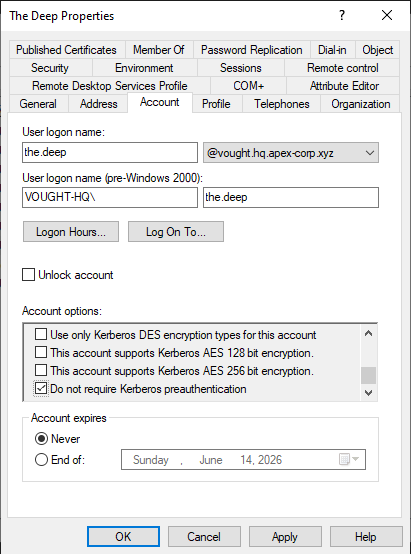
User Account tab in ADUC showing Do not require Kerberos preauthentication checkbox checked
"Do not require Kerberos preauthentication" checked — AS-REPRoastable target
User General tab showing the password written in plaintext in the Description field
Password written in the Description field — a real misconfiguration that you find in actual environments

Group Permission Misconfiguration

Added Sister Sage as a member of the D7 group with explicit write permissions — this creates a GenericWrite-type misconfiguration that can be abused for privilege escalation.
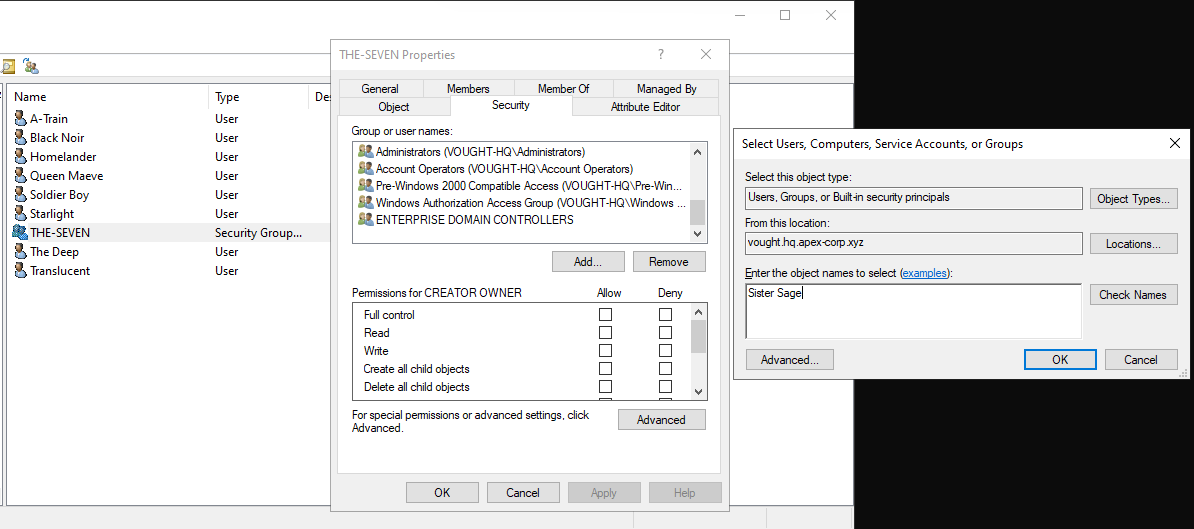
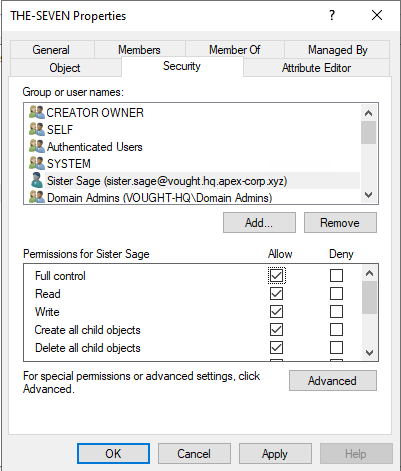
D7 group Security tab showing Sister Sage added with Allow permissions including Write Members
Sister Sage given write permissions on D7 group — GenericWrite misconfiguration
D7 group members tab showing all D7 team members listed
D7 group members — The Boys characters used for realistic group membership

Homelander as Domain Admin on Child Domain

Added Homelander (john.gillman) to the Domain Admins group on the child domain. This is the main misconfiguration in the attack path:
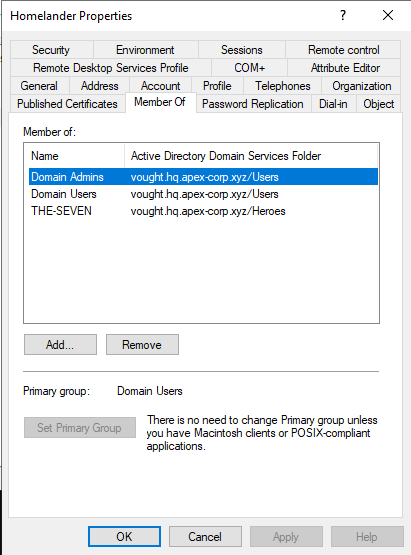
Domain Admins group on vought.hq.apex-corp.xyz showing homelander added as a member
Homelander added to Domain Admins on the child domain — the key privilege escalation path
PowerShell — verify
PS> Get-ADGroupMember -Identity "Domain Admins" -Recursive

Get-ADGroupMember output on VOUGHT domain showing Administrator and homelander in Domain Admins
Confirmed — Homelander is in Domain Admins on the VOUGHT child domain

Step 9 — Join Linux to the Child Domain

SSH'd into BATCAVE using the private key from Oracle:

Bash
$ ssh -i oracle-key.pem ubuntu@<BATCAVE-PUBLIC-IP>
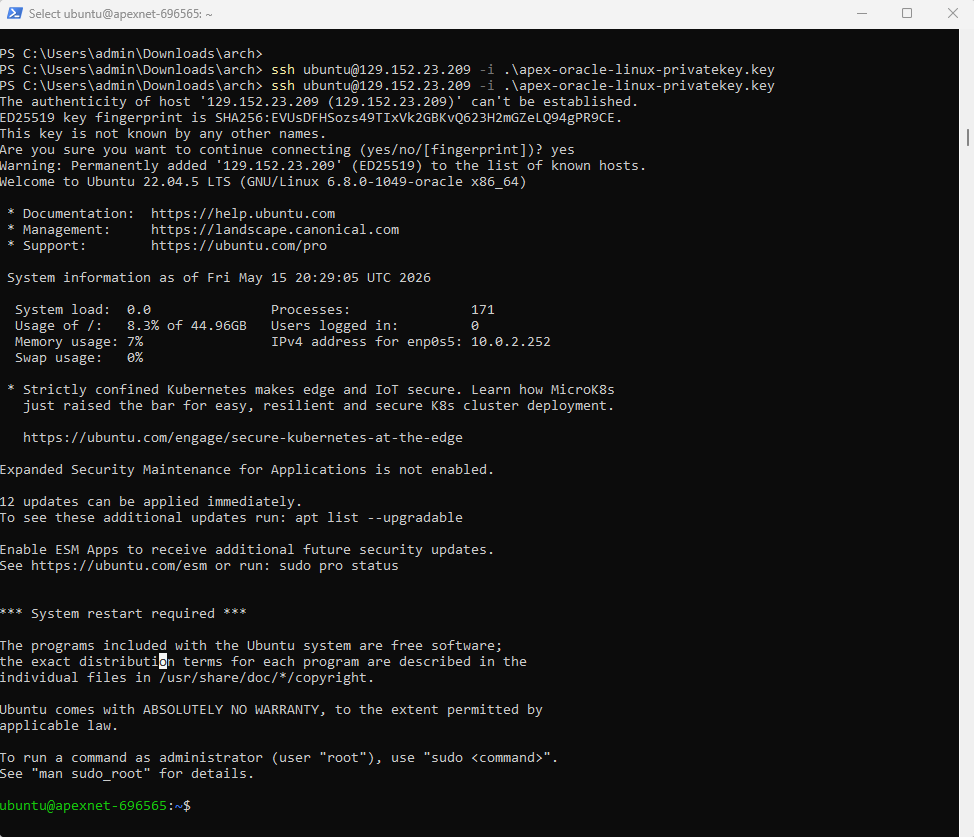
Terminal showing successful SSH login to BATCAVE Ubuntu machine using the Oracle private key
SSH into BATCAVE successful using the downloaded private key

Added a security rule to allow all traffic within the private subnet so Linux and Windows can talk to each other:
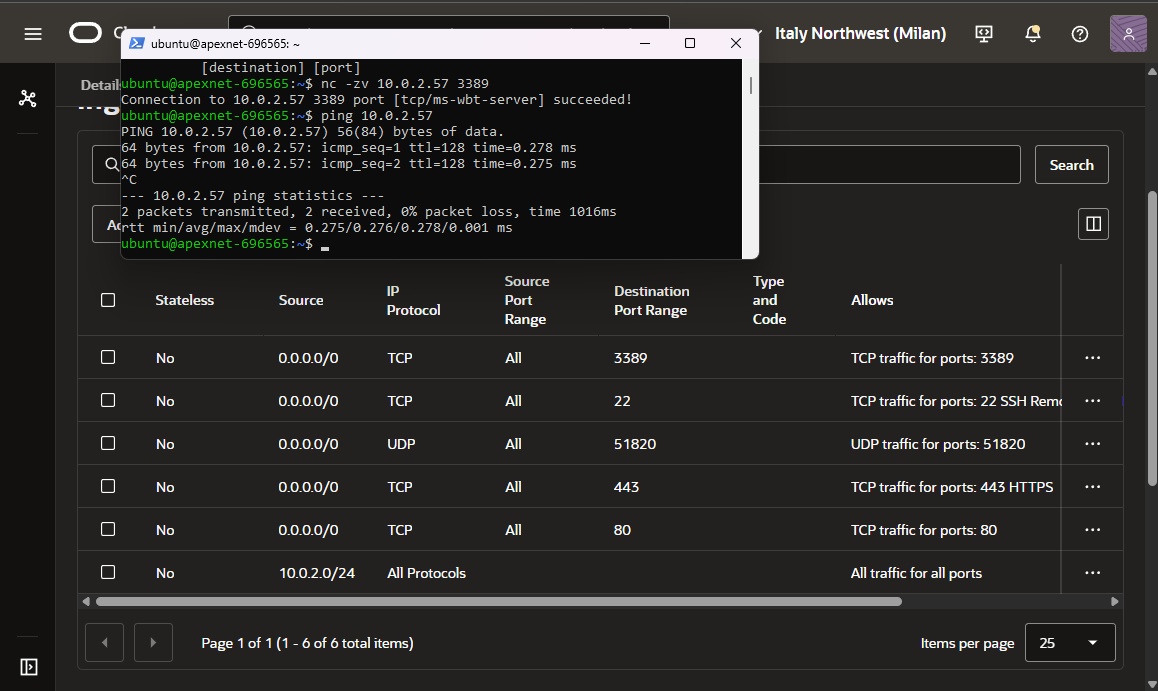
Oracle security list showing an ingress rule added to allow all traffic from the 10.x.x.x private subnet
Allowing intra-subnet traffic — Linux and Windows can now reach each other

Installed the required packages for domain join:

Bash
sudo apt install -y realmd sssd sssd-tools adcli krb5-user samba-common-bin

During krb5-user installation, Linux shows a curses dialog asking for the Kerberos realm. Entered VOUGHT.HQ.APEX-CORP.XYZ in uppercase — Kerberos realm names are case sensitive:

Linux terminal showing curses-style GUI asking for the default Kerberos realm with VOUGHT.HQ.APEX-CORP.XYZ entered
Kerberos realm entry — must be uppercase: VOUGHT.HQ.APEX-CORP.XYZ

Discovered the realm:

Bash
$ realm discover vought.hq.apex-corp.xyz
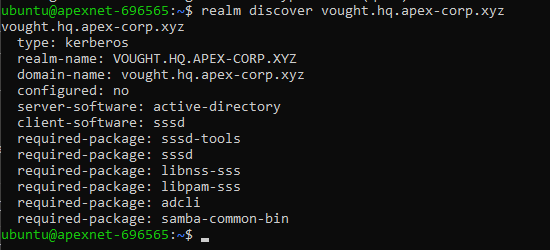
realm discover output showing vought.hq.apex-corp.xyz realm details including configured yes and realm-name
realm discover shows the domain is reachable and returns its configuration

Set the hostname and added a DNS entry for the VOUGHT Windows machine:

Bash
sudo hostnamectl set-hostname cyborg.vought.hq.apex-corp.xyz
echo "<VOUGHT-WINDOWS-PRIVATE-IP> vought.hq.apex-corp.xyz" | sudo tee -a /etc/hosts
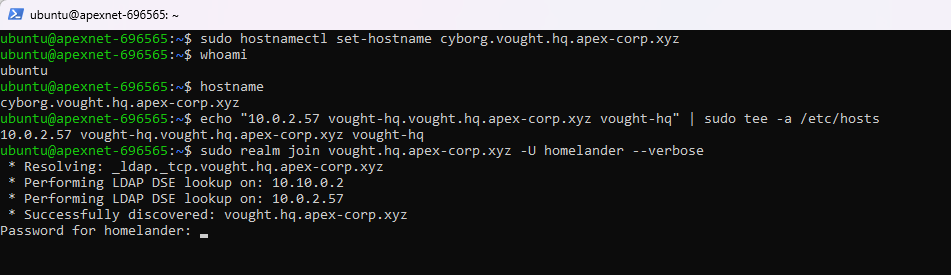
Terminal showing hostnamectl set-hostname command and attempting to join vought.hq.apex-corp.xyz
Setting hostname to cyborg and preparing to join the domain

First Attempt — Failed (Reverse DNS Issue)

First try to join the domain failed with "insufficient permissions". This is a misleading error — the real problem is that Linux was trying to do a reverse DNS lookup on the DC IP to validate the server identity, and that lookup was failing.
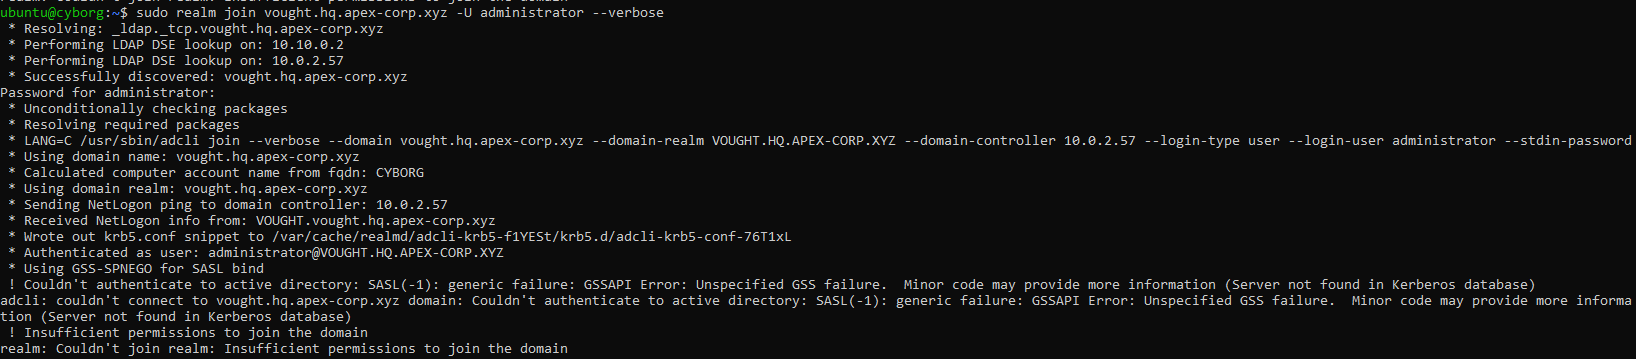
realm join output showing all LDAP checks passed but failing at the end with Couldn't join realm insufficient permissions error
Join fails with "insufficient permissions" — actually a reverse DNS lookup failure

Fix — Disable Reverse DNS in Kerberos

The fix is adding rdns = false to /etc/krb5.conf. This tells Kerberos to not do reverse DNS validation on the server:
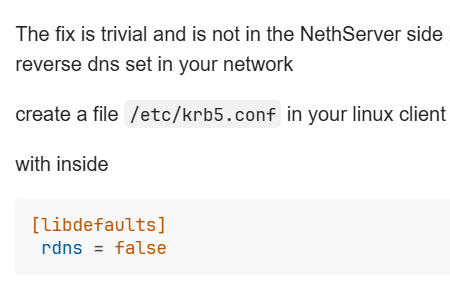
krb5.conf file open in nano editor showing rdns = false added under libdefaults section
Adding rdns = false to krb5.conf — this is the fix for the reverse DNS issue
/etc/krb5.conf — add this under [libdefaults]
[libdefaults]
    rdns = false

Second Attempt — Success

Bash — domain join
$ sudo realm join vought.hq.apex-corp.xyz -U homelander
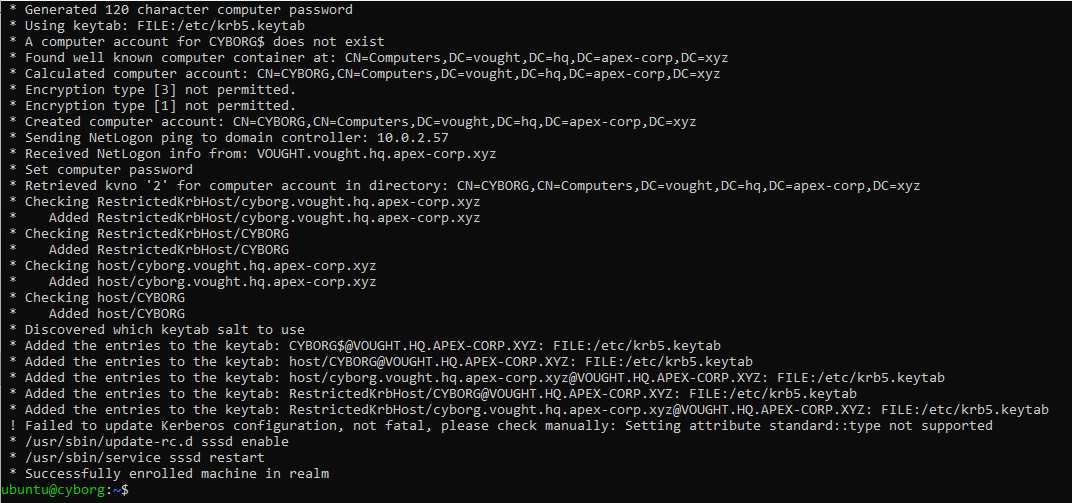
realm join output showing all steps completing successfully including adding keytab entries, setting up SSSD, and Successfully enrolled machine in realm
Domain join succeeded — "Successfully enrolled machine in realm"

Verified with a Kerberos ticket:

Bash
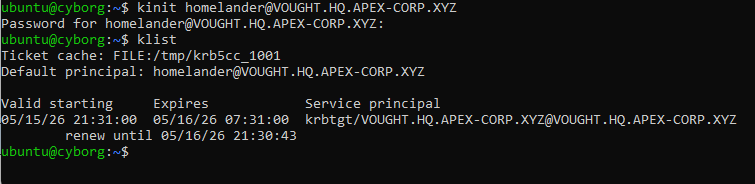
$ kinit [email protected] $ klist
klist output showing a valid Kerberos ticket for homelander@VOUGHT.HQ.APEX-CORP.XYZ with expiry time
Kerberos ticket obtained — homelander authenticated from Linux to the domain

Logged in as a domain user from the Linux command line:

Linux terminal showing su command used to switch to administrator@vought.hq.apex-corp.xyz successfully
Switching to domain user on Linux — authentication working

Step 10 — Connect Linux to DC01 via WireGuard

Added the Oracle Linux machine as a peer on DC01 with WireGuard IP 10.10.0.3:
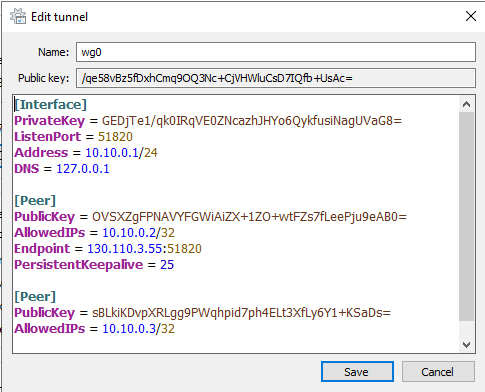
WireGuard GUI on DC01 showing the Oracle Linux BATCAVE machine added as a new peer with AllowedIPs 10.10.0.3/32
Adding BATCAVE as a peer on DC01 — AllowedIPs is /32 for a single peer

On BATCAVE, installed WireGuard and created the config:

Bash — install and configure WireGuard
sudo apt install -y wireguard
sudo nano /etc/wireguard/wg0.conf
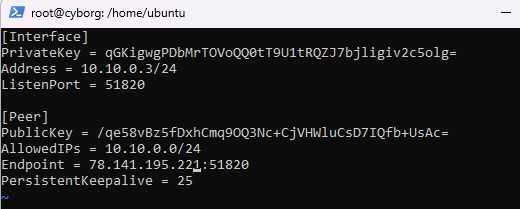
nano editor open showing /etc/wireguard/wg0.conf being edited with Interface and Peer sections
Editing the WireGuard config on BATCAVE
/etc/wireguard/wg0.conf — BATCAVE (10.10.0.3)
[Interface]
PrivateKey = <LINUX-PRIVATE-KEY>
Address = 10.10.0.3/24
ListenPort = 51820

[Peer]
PublicKey = /qe58vBz5fDxhCmq9OQ3Nc+CjVHWluCsD7IQfb+UsAc=
AllowedIPs = 10.10.0.0/24
Endpoint = <DC01-VULTR-PUBLIC-IP>:51820
PersistentKeepalive = 25
Bash — start the tunnel
$ sudo systemctl enable wg-quick@wg0 $ sudo systemctl start wg-quick@wg0 $ ping -c 3 10.10.0.1
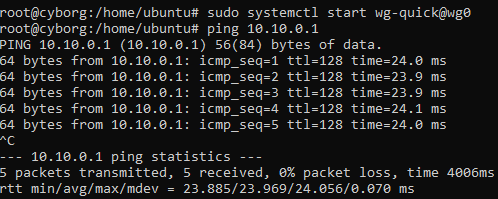
Ping from BATCAVE to DC01 at 10.10.0.1 showing successful replies through the WireGuard tunnel
BATCAVE can reach DC01 through WireGuard — tunnel working
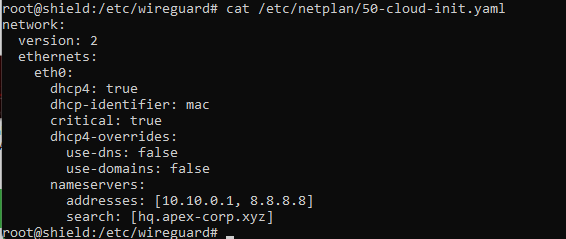
Netplan config and DNS resolution showing 10.10.0.1 as the DNS server working for hq.apex-corp.xyz
DNS resolving through DC01 — netplan config applied correctly

Step 11 — Verify Cross-Domain SSH and SMB Access

Logged into BATCAVE via SSH using Tony Stark's account (who lives on the parent domain) and Homelander (child domain). Both worked:
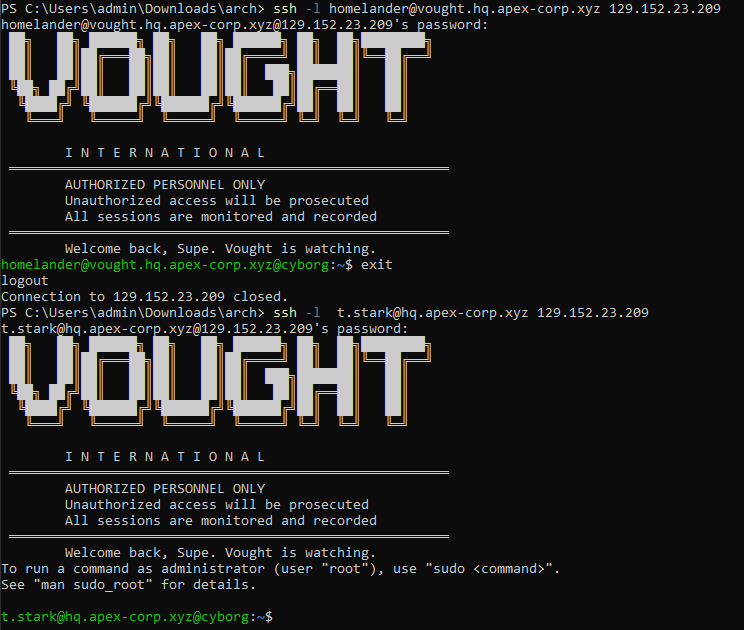
Two terminal windows showing successful SSH login to BATCAVE using t.stark@hq.apex-corp.xyz and homelander@vought.hq.apex-corp.xyz
Both parent and child domain accounts can SSH into the Linux machine

Tested SMB access from Linux to the DC:

Bash
$ smbclient //stark-tower.hq.apex-corp.xyz -U t.stark
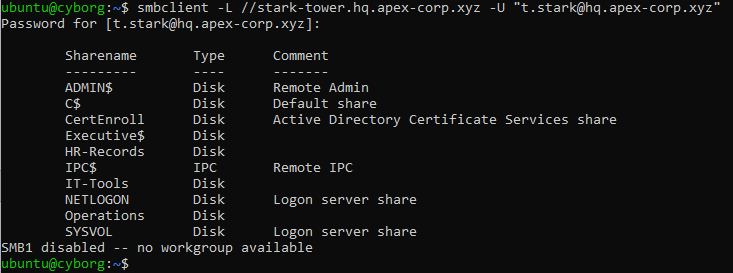
smbclient connected to STARK-TOWER showing ls output with Operations, IT-Tools, HR-Records shares listed
SMB shares visible from Linux — cross-domain and cross-cloud access working

Ran nslookup tests to confirm DNS resolution from Linux:
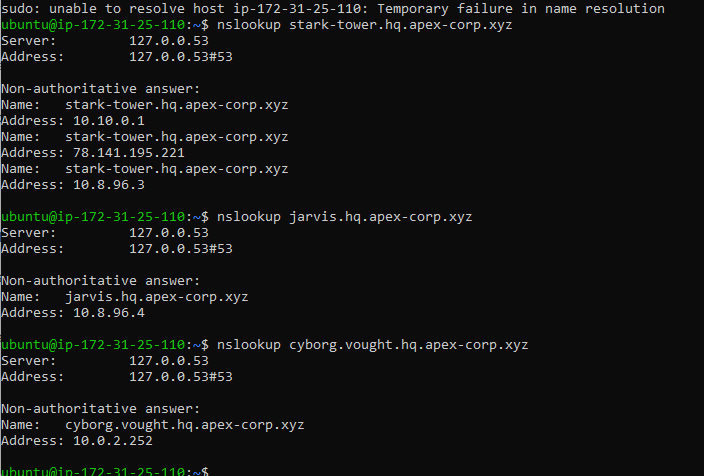
nslookup results on BATCAVE showing stark-tower.hq.apex-corp.xyz and jarvis.hq.apex-corp.xyz both resolving correctly via 10.10.0.1
DNS working end to end — all internal hostnames resolving through DC01
BATCAVE — Oracle Linux, domain joined
$ realm list
vought.hq.apex-corp.xyz
type: kerberos
realm-name: VOUGHT.HQ.APEX-CORP.XYZ
domain-name: vought.hq.apex-corp.xyz
configured: kerberos-member
server-software: active-directory
client-software: sssd
required-package: sssd-tools
required-package: sssd
required-package: adcli
required-package: realmd
login-formats: %[email protected]
[+] BATCAVE is domain-joined to vought.hq.apex-corp.xyz

Deployment Checklist